Basic CSS
Styles
The appearance (color, size, and position among other things) of HTML elements can be styled through
Cascading Style Sheets or CSS. Style sheets are lists of rules which tell the browser how to display certain elements of
a web page. The idea behind CSS is to separate the content of a web page from the presentation. If the appearance of a web page is formatted
with CSS, then the entire web page can be reformatted easily without having to modify the content. This allows content to be reused and redisplayed
on different devices.
CSS can be included in a web page in three different ways. First, the CSS can be placed in an external file separate from the HTML file. To include a
style file style.css in an HTML file, include this line in the head section of the HTML file:
<link rel="stylesheet" type="text/css" href="quick.css">
CSS can also be included in the head section of an HTML file. Doing so would involve using code such as this in the head section:
<style type="text/css">
...STYLE RULES...
</style>
Finally, CSS can be included inline within the HTML content of a web page. This defeats the purpose of separating content and presentation. It also prevents the ability of using the same CSS to
style multiple HTML elements, but sometimes it is a quick means to an end. Styling a div with inline CSS would look something like:
<div style="...STYLE RULES..."> DIV CONTENTS </div>
Selectors
Selectors are used to declare which HTML elements a style affects. Selectors are most often an element's type, id, or class. This example shows how to use types of HTML elements as selectors:
table {
	...STYLE RULES HERE WILL APPLY TO ALL TABLES...
}
p {
	...STYLE RULES HERE WILL APPLY TO ALL PARAGRAPHS...
}
h1 {
	...STYLE RULES HERE WILL APPLY TO ALL H1 HEADERS...
}
Note how the style rules for each type of element are included within braces. This next example shows how to use an element's id as a selector:
#titlebar {
	...STYLE RULES HERE WILL APPLY TO THE ELEMENTS WITH ID titlebar...
}
#menubar {
	...STYLE RULES HERE WILL APPLY TO THE ELEMENTS WITH ID menubar...
}
Notice how the id is preceded by a number sign # when used as a selector. Also notice how the blocks of rules for each id are grouped with braces. The next example show how to use a class as a selector.
div.urgent {
	...RULES FOR DIVS WITH CLASS urgent...
}
p.indented {
	...RULES FOR PARAGRAPHS WITH CLASS indented...
}
...INSIDE THE HTML...
<div class="urgent"> DIV CONTENT </div>
...
<p class="indented"> P CONTENT </div>
Note that individual HTML elements must use the appropriate
class attribute to have the style apply to them.
Unstyled
Most CSS styles can be applied to most types of HTML elements. In the next few examples, we will will demonstrate some simple styles by modifying a single unexciting div. Here is the unstyled div.
I am a div. I am a div. I am a div. I am a div. I am a div. I am a div. I am a div. I am a div. I am a div. I am a div.
<div class="style1"> I am a div. I am a div. I am a div. I am a div.
I am a div. I am a div. I am a div. I am a div.
I am a div. I am a div. </div>
Background
We start with the background color so that we can see the shape of our div. The background color can be specified by one of the color names, by hex value, or by rgb(a,b,c) value.
I am a div. I am a div. I am a div. I am a div. I am a div. I am a div. I am a div. I am a div. I am a div. I am a div.
IN THE HEAD...
<style type="text/css">
     div.style1 {
          background: steelblue;
     }
</style>
When we add this code to the head of the HTML file, all divs with class
style1 will be automatically styled. Notice how the background property is specified --
property: value; . All property values will be set in this way.
Notice also how now we can see that the div extends all the way across the page (or across the div that we have containing it) by default.
Color
Text color can be set with the
color: property.
I am a div. I am a div. I am a div. I am a div. I am a div. I am a div. I am a div. I am a div. I am a div. I am a div.
IN THE HEAD...
<style type="text/css">
     div.style1 {
          background: steelblue;
          color: white;
     }
</style>
Font
CSS can be used to specify the font used inside an element.
I am a div. I am a div. I am a div. I am a div. I am a div. I am a div. I am a div. I am a div. I am a div. I am a div.
IN THE HEAD...
<style type="text/css">
     div.style1 {
          background: steelblue;
          color: white;
          font: italic 20px "Times New Roman";
     }
</style>
We specified the font type (italic or normal), size, and family (Times New Roman) all at once. We could also specify them separately:
IN THE HEAD...
<style type="text/css">
     div.style1 {
          background: steelblue;
          color: white;
          font-family: "Times New Roman";
          font-type: italic;
          font-size: 20px;
     }
</style>
Dimensions
We can specify the dimensions of an element with the
width and
height attributes. This can also be done in a more dynamic way to fit elements on a page to different devices.
I am a div. I am a div. I am a div. I am a div. I am a div. I am a div. I am a div. I am a div. I am a div. I am a div.
IN THE HEAD...
<style type="text/css">
     div.style1 {
          background: steelblue;
          color: white;
          font: italic 20px times new roman;
          width: 200px;
          height: 100px;
     }
</style>
We can also specify the dimensions as a percentage of the element which contains the div:
I am a div. I am a div. I am a div. I am a div. I am a div. I am a div. I am a div. I am a div. I am a div. I am a div.
IN THE HEAD...
<style type="text/css">
     div.style1 {
          background: steelblue;
          color: white;
          font: italic 20px times new roman;
          width: 25%;
          height: 100px;
     }
</style>
Scrolling
The first example above for resizing the div is less than acceptable because our content does not fit in the div. We can allow scrolling with the
overflow property. The value of
auto tells the browser to add
scrollbars when necessary.
I am a div. I am a div. I am a div. I am a div. I am a div. I am a div. I am a div. I am a div. I am a div. I am a div.
IN THE HEAD...
<style type="text/css">
     div.style1 {
          background: steelblue;
          color: white;
          font: italic 20px times new roman;
          width: 200px;
          height: 100px;
          overflow: auto;
     }
</style>
Borders
Elements can be given borders with the
border property.
I am a div. I am a div. I am a div. I am a div. I am a div. I am a div. I am a div. I am a div. I am a div. I am a div.
IN THE HEAD...
<style type="text/css">
     div.style1 {
          background: steelblue;
          color: white;
          font: italic 20px times new roman;
          width: 200px;
          height: 130px;
          border-style: solid;
          border-color: lightblue;
          border-width: 5px;
     }
</style>
Border style, color, and width can be set all at once like fonts:
IN THE HEAD...
<style type="text/css">
     div.style1 {
          background: steelblue;
          color: white;
          font: italic 20px times new roman;
          width: 200px;
          height: 130px;
          border: 5px solid lightblue;
     }
</style>
Here are some other border styles:
none
dotted
dashed
solid
double
groove
ridge
inset
outset
hidden
Corners
Corners of elements can be rounded with the
border-radius property. This property replaces each corner of an element with a quarter circle of radius border-radius. The larger the border radius, the smoother the corner will be.
I am a div. I am a div. I am a div. I am a div. I am a div. I am a div. I am a div. I am a div. I am a div. I am a div.
IN THE HEAD...
<style type="text/css">
     div.style1 {
          background: steelblue;
          color: white;
          font: italic 20px times new roman;
          width: 200px;
          height: 130px;
          border: 5px solid lightblue;
          border-radius: 20px;
     }
</style>
Padding
The rounded corner example is not appealing because the content of the div is too close to the edge. To fix this, we can add some
padding around the content of the div.
I am a div. I am a div. I am a div. I am a div. I am a div. I am a div. I am a div. I am a div. I am a div. I am a div.
IN THE HEAD...
<style type="text/css">
     div.style1 {
          background: steelblue;
          color: white;
          font: italic 20px times new roman;
          width: 200px;
          height: 130px;
          border: 5px solid lightblue;
          border-radius: 20px;
          padding: 10px;
     }
</style>
Margin
If we place two copies of the div we have created above together, the result is less than pleasing for a couple of reasons. First, the divs are too close together.
I am a div. I am a div. I am a div. I am a div. I am a div. I am a div. I am a div. I am a div. I am a div. I am a div.
I am a div. I am a div. I am a div. I am a div. I am a div. I am a div. I am a div. I am a div. I am a div. I am a div.
This can be fixed with the
margin property. This property places a specified distance of blank space around an element.
I am a div. I am a div. I am a div. I am a div. I am a div. I am a div. I am a div. I am a div. I am a div. I am a div.
I am a div. I am a div. I am a div. I am a div. I am a div. I am a div. I am a div. I am a div. I am a div. I am a div.
IN THE HEAD...
<style type="text/css">
     div.style1 {
          background: steelblue;
          color: white;
          font: italic 20px times new roman;
          width: 200px;
          height: 130px;
          border: 5px solid lightblue;
          border-radius: 20px;
          padding: 10px;
          margin: 10px;
     }
</style>
Using
margin: auto; is a shortcut for centering an element.
I am a div. I am a div. I am a div. I am a div. I am a div. I am a div. I am a div. I am a div. I am a div. I am a div.
The properties
margin-top,
margin-bottom,
margin-left,
margin-right can be used to set different margins on the top, bottom, left, and right sides of an element.
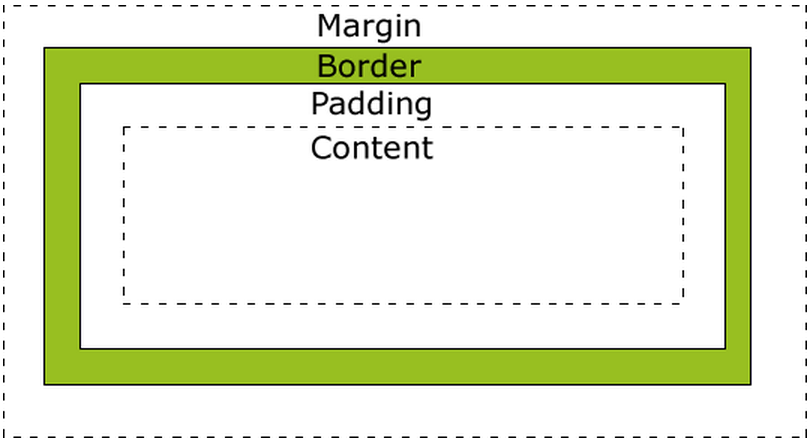
Box Model
All HTML elements can be thought of as boxes or containers with special wrappers.
- The margin of an element is transparent space placed between the element and any adjacent objects. The margin is not affected by the elements background color and does not affect the elements width or height style properties.
- The border of an element is determined by the element's style and is affected by the background color. The border does not affect the elements width or height style properties.
- The padding of an element space between the content and the border. Padding is affected by the background color but does not affect the elements width or height style properties.
- The size of the content of an element is determined by the width and height style properties of the element.
Display
In the previous example, the two divs are displayed one above the other. What if we want them side-by-side? This can be accomplished with the
display property.
The
display property can have four values: block, inline, inline-block, and none. To give examples of each of these, we start over with two simple styles applied to two divs with just enough color to tell them apart.
In this first example, both divs have a display style of block. This is the default for divs. The two divs are stacked on top of each other - there is a line break inserted between the divs.
Blue div. Blue div. Blue div. Blue div. Blue div. Blue div.
Red div. Red div. Red div. Red div. Red div. Red div.
IN HEAD...
<style type="text/css">
     div.blue {
          background: lightblue;
          width: 200px;
          height: 200px;
          display: block;
     }
     div.red {
          background: red;
          width: 200px;
          height: 200px;
          display: block;
     }
</style>
...IN BODY...
<div class="blue"> Blue div. Blue div. Blue div. Blue div. Blue div.  Blue div. </div>
<div class="red"> Red div. Red div. Red div. Red div. Red div.  Red div. </div>
In this second example, the two divs have display style inline-block. Here, the divs are side by side in the horizontal flow of content without a line break between them.
Blue div. Blue div. Blue div. Blue div. Blue div. Blue div.
Red div. Red div. Red div. Red div. Red div. Red div.
IN HEAD...
<style type="text/css">
     div.blue {
          background: lightblue;
          width: 200px;
          height: 200px;
          display: inline-block;
     }
     div.red {
          background: red;
          width: 200px;
          height: 200px;
          display: inline-block;
     }
</style>
...IN BODY...
<div class="blue"> Blue div. Blue div. Blue div. Blue div. Blue div.  Blue div. </div>
<div class="red"> Red div. Red div. Red div. Red div. Red div.  Red div. </div>
In this example, both divs have a display style of inline. The content of the blocks is run together in line with other text and such. Notice how the width and height properties now do not matter.
Blue div. Blue div. Blue div. Blue div. Blue div. Blue div.
Red div. Red div. Red div. Red div. Red div. Red div.
IN HEAD...
<style type="text/css">
     div.blue {
          background: lightblue;
          width: 200px;
          height: 200px;
          display: inline;
     }
     div.red {
          background: red;
          width: 200px;
          height: 200px;
          display: inline;
     }
</style>
...IN BODY...
<div class="blue"> Blue div. Blue div. Blue div. Blue div. Blue div.  Blue div. </div>
<div class="red"> Red div. Red div. Red div. Red div. Red div.  Red div. </div>
Here is an example mixing inline and inline-block
Blue div. Blue div. Blue div. Blue div. Blue div. Blue div.
Red div. Red div. Red div. Red div. Red div. Red div.
IN HEAD...
<style type="text/css">
     div.blue {
          background: lightblue;
          width: 200px;
          height: 200px;
          display: inline;
     }
     div.red {
          background: red;
          width: 200px;
          height: 200px;
          display: inline-block;
     }
</style>
...IN BODY...
<div class="blue"> Blue div. Blue div. Blue div. Blue div. Blue div.  Blue div. </div>
<div class="red"> Red div. Red div. Red div. Red div. Red div.  Red div. </div>
An element with a display style of none will not appear. This is a good way to "hide" elements until you want them seen. The default display style for divs is block. The default for spans is inline.